Better Basketball logo

The Tribe

Perhaps one the most important times for a coach is the weeks immediately following the season. During this time you get the chance to look at what worked and what didn't, locate successes and failures, analyze all of it and make a rough plan for...

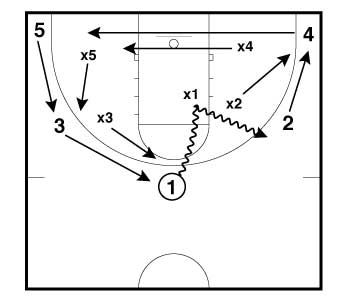
In yesterday's post, we mentioned the simplicity of the Escape Hatch for a dribble penetrator who can't make it all the way to the rim or just doesn't like what he sees. Today, let's take it one step further. What if that ball handler (1 in this case) drove right, bounced off to the Escape Hatch, then immediately crossed over and attacked again - this time to the left? What would that do to the defense? Let's take a look at it. Bounce Off Escape Attack Frame 1
With 1 driving right, every other offensive player Circle Moves to the right. This forces every defensive player to rotate as well. Most likely, x2 has helped on the drive and now must recover to his man in the corner.

Since the Read & React promotes spacing, player movement, and ball movement, some suggest that a team can't rebound well amidst the constant shuffling. Of course, we disagree. But, due to all that movement, sometimes rebounding responsibilities can get lost in the continual mix of players.
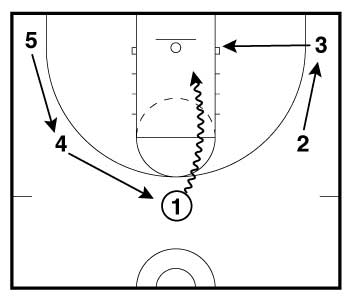
Here's a drill that can clarify those rebounding responsibilities for you and your team. Rick explains this drill completely in the audio portion below, but I thought a diagram or four might be helpful. And, for more audio from PGC Basketball's interview with Rick, you can check out this post and this one. 3:15 - Rick Torbett on Rebounding Responsibility The best part of this rebounding component is you can attach it to the end of any 5 player drill. That way you can work on whatever actions you need to while still getting in your rebounding work. In this instance, we used a simple 5 player Circle Movement Drill. Basketball Rebounding Drill Frame 1
Start with any player driving North-South to the goal. This forces the other players to Circle Move one spot. Here, 1 drives North-South right causing Circle Movement right.

We get a lot of questions about zones. For coaches that have been used to running separate man and zone offenses, it is sometimes difficult to make the mental transition that the Read & React Offense can be used for both. Sure, there are certain layers that work better against zones and there are a few tweaks that will help a great deal. Let's examine one of those tweaks - the Hook & Look as it dovetails into Pass & Cut. Against a zone, adjust your Pass & Cut layer like this: when you pass (instead of cutting in a straight line to the basket), you should hook into a seam of the zone and stay in that seam for one pass before filling out. Holding for one pass is important: often the zone may maintain good defensive position on your initial cut, but lose track of you when an extra pass makes them shift. In the following clips, you'll see how a 13U Travel Team from South Windsor, CT uses this simple tweak to attack zones, many times getting lay-ups. Yes, lay-ups against a zone are possible.

We often hear (from coaches that don't know the offense very well) that the Read & React doesn't promote screening. And, that couldn't be further from the truth - you just have to emphasize it. Here are 4 steps that will train your players to spot some of the screening opportunities within the flow of the offense. Step 1: Start with the basics. If you have a post player, try this simple 5 on 0 drill. Place 4 players on the perimeter running though Pass & Cut. Tell your post player to screen for cutters coming into the lane and leaving the lane. And, just like the Post Screening layer says, have the post player set a screen, then shape up for the ball. Set a screen, then shape. Screen, then shape. The only way to score in this drill is to hit a cutter (following a screen) for a lay-up or to feed the post on the shape up. After the score, just rotate the post - it wouldn't be a bad idea to rotate guards through the post as well. If you typically run a 5 OUT, start with 5 players on the perimeter running through Pass & Cut. At random each player must stop in the post, set some screens for cutters, then shape up after a screen. Following the shape up, they can vacate the post and return to the perimeter. In this version of the drill, the only way to score is a post feed to a shaping up post player. After the score, simply grab the rebound, pass it back to the perimeter and continue the drill until every player has stopped in the post, set screens for cutters, shaped up, and scored. With those drills, you get to work on Layer 1, feeding the post, scoring in the post, setting screens, and using screens. Step 2: Building on the basics.